Emulating a Pokemon Trade with Generated Link Cable Data
Trading Pokemon with a test script. If only I could have done this when I was 10.
The need to test #
Last time, we talked about the online Game Boy link cable project we started. After some preliminary research, we ordered all of the necessary components (and more) to start experimenting. In order to minimize mistakes and confirm that everything continues to operate correctly when changes are made, we’ll develop small self-contained tools and pieces of functionality incrementally and continually build on that foundation. The goal is to have something that works at all times, no matter how small or limited it may be.
So, after ordering the necessary hardware for serial communication, a good first step is coming up with some information to communicate! This can be done without any real hardware by using emulation. The goal is to create some known good data which can be used to verify the eventual hardware setup.
How to test #
The obvious choice of test data is game data – sending some bytes that an actual Game Boy game would have sent and making sure that a real copy of the game behaves as expected in response. We decided on mimicking a Pokemon Generation 1 trade since Pokemon is a game we definitely want to support, we have it on hand for testing with real hardware, and it’s not Tetris. The existing project that inspired this one is based around Tetris, and understanding the inner-workings of as many different games as possible (such as Pokemon) is important for getting a sense of how to design our project.
Spoofing a Pokemon trade requires a thorough understanding of how the game’s link cable protocol works. Emulation can be used to validate the generated data without a hardware setup. BGB is a well-known Game Boy/Game Boy Color emulator that supports “linking” multiple instances. It can also log all of the bytes sent over the emulated link cable connection, which is invaluable for understanding the protocol of any game of interest. For when that’s not enough, BGB features a solid debugger for reverse-engineering. The emulator’s link cable interface is exposed over TCP, making it straightforward to send arbitrary data without having to modify any emulator internals. It also means that in theory the final version of GBPlay could support the BGB network protocol – allowing emulated games to link up with real ones.
Once the fake Pokemon trade data has been confirmed to work with BGB, we can be reasonably confident that it will work with an original Game Boy as well. Then, the same data can be sent to a real Game Boy instead of the emulator, providing an easy way to test the connection.
Pokemon link cable protocol #
In order to generate data that mimics a second copy of Pokemon, we’ll first need to understand how the game communicates over the link cable. As mentioned, BGB can log link cable traffic. However, since this is Pokemon we’re talking about, we can benefit from the hard work of those who came before us. There exists a comprehensive disassembly of the first generation Pokemon games (and beyond), and others have already worked out the link cable protocol. Below is a detailed description of the various steps involved in a Pokemon trade.
Role negotiation #
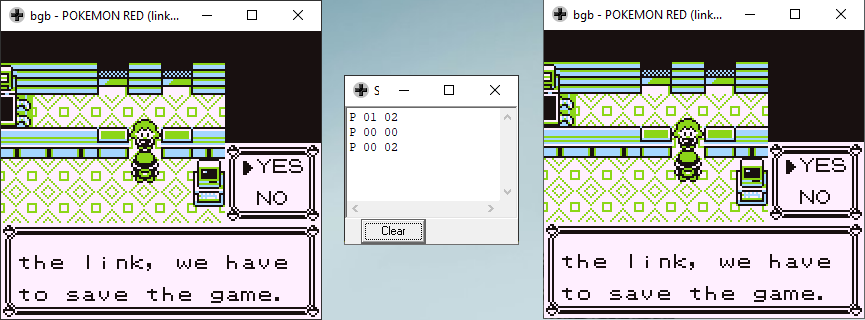
Initiating a connection. Choosing roles requires only a few bytes.
As described in the previous post, when communicating, one Game Boy acts as the master device and provides the link’s clock signal. Since both consoles will be running identical code, games need to include a mechanism for determining which instance will provide the clock signal and consequently initiate all data transfers. The way Pokemon implements role negotiation is extremely simple.
When visiting the Cable Club at a Pokemon Center, the game will first operate
in slave mode and wait for a serial transfer to be initiated by the other Game
Boy (i.e., try to use an external clock signal). If this happens, it will
respond with the value 2. If instead no such transfer occurs, then the game
will switch to master mode and send the value 1 to the other Game Boy (i.e.,
using an internal clock signal). This is done in a loop until the connection is
successful or enough failed attempts take place. If the master game receives a
2 and the slave game receives a 1 then both instances will send two 0
bytes, save the game, exchange a 0x60 byte for synchronization, and then
display the in-game link type selection menu.
Link type selection #
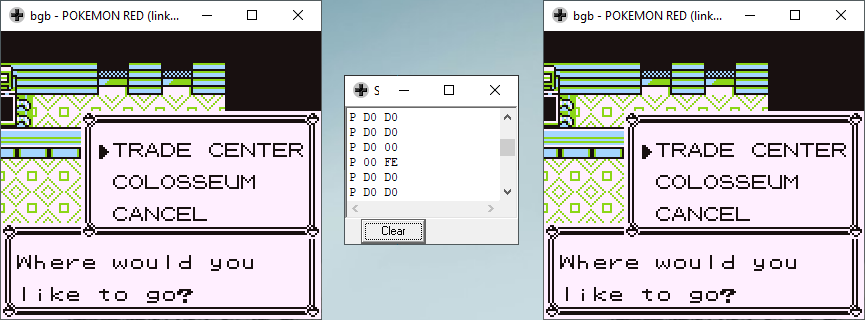
Choosing a destination. Bytes are sent continuously to allow either player to decide.
After the link has been established, both players are asked where they would
like to go – either the Trade Center (for trades) or Colosseum (for battles)
– or they can choose to cancel and close the link. All link cable transfers
must be initiated by the master, but the game allows either player to select
the destination. So while on this screen, the master will continually send
values of the form 0xDx (where the bottom 2 bits of x store the index of the
highlighted option) to poll the other game, which will respond with a value
following the same format. Whichever side the selection is made on first will
indicate it by setting bit 2 of its value: 0xD4 for the Trade Center, 0xD5
for the Colosseum, or 0xD6 to cancel. A cancel can also be signaled by setting
bit 3, which indicates that the B button was pressed on the associated menu
entry.
For our purposes, we will be faking a trade and will not go into detail on how battles work.
Trade Center #
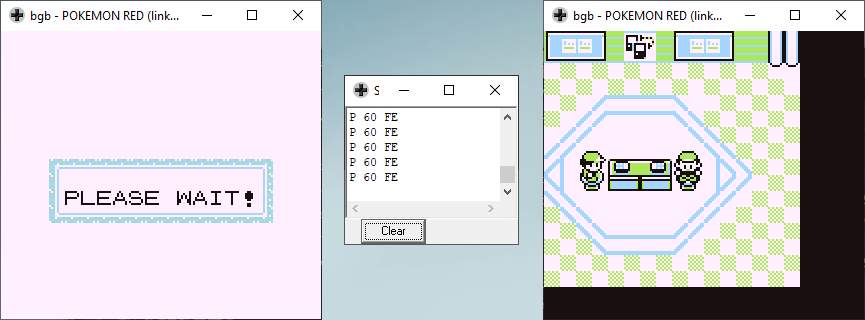
The Trade Center. Player 1 has already interacted with the trade machine and must wait until player 2 does the same.
After the selection is made to go to the Trade Center, both players are
brought there but nothing else happens yet. No further transfers occur until
both players interact with the trade machine, which is signaled by sending
the value 0x60. After this, the main transfer can begin. Interestingly
there’s no way to cancel or otherwise exit the Trade Center. To leave, the game
must be reset (saves the original developers and us some work).
Trainer data exchange #
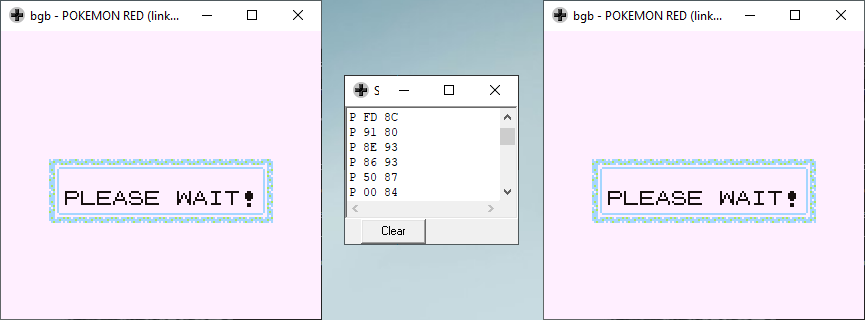
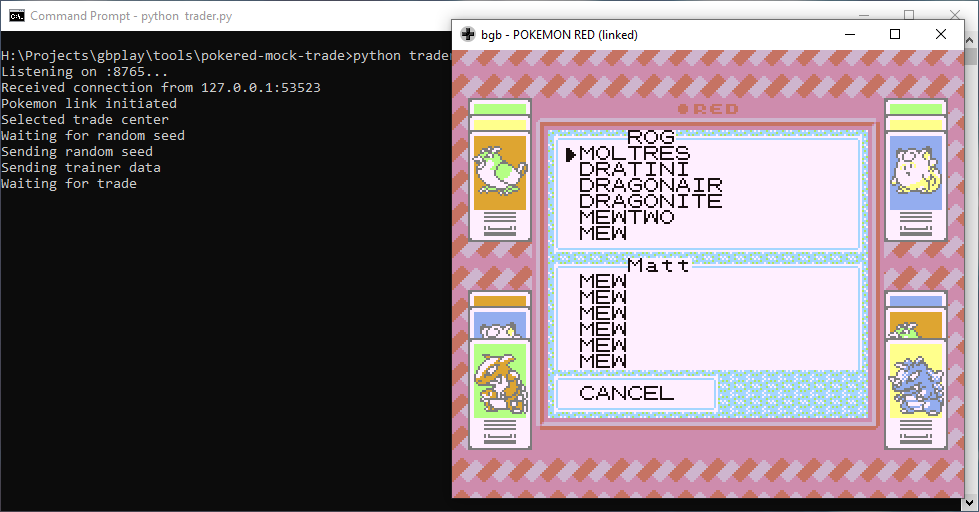
Sending trainer data before displaying the trade menu. 0x8C 0x80 0x93 0x93 0x87 0x84 is MATTHE in Pokemon’s character encoding – the first 6 letters of my/player 2’s name.
Before the actual trainer data is sent, some random bytes are exchanged. These are used to ensure consistency in link cable battles. For example, to guarantee that the outcome of attacks is the same for both players. For simplicity, the game uses the same code regardless of link cable connection type. Since we’re doing a trade, these bytes are irrelevant and don’t need to be understood further.
After the random bytes, Pokemon trainer data is exchanged. The 424-byte data structure contains the name of the trainer, as well as detailed information for every Pokemon in their party (level, moves, stats, etc.). The party Pokemon portion is helpfully documented on Bulbapedia.
Sending this all up-front greatly simplifies the trade process. Players can view the stats of every Pokemon in their friend’s party and change their mind about which one they want without having to send additional information. When a trade is confirmed, the game simply needs to copy the appropriate Pokemon data from the already-received block of memory into the proper location in the player’s save file and then remove the Pokemon they traded away.
Trade selection and confirmation #
Once the trainer data has been exchanged, the trade menu is shown and players
can view Pokemon stats and select which one they want to trade away. During
this time, the master polls the slave by repeatedly sending 0 similarly to
what happened during the link type selection step. Either player can exit the
trade menu by sending 0x6F which will cause the players to go back to the
Trade Center. To trade, each side first indicates the selected Pokemon by
sending its index number in the party Pokemon list (ranging from 0x60 to
0x65). The game then displays a confirmation dialog stating which two Pokemon
are about to be traded. If a player cancels the trade at this point, 0x61 is
sent and the selection process is repeated.
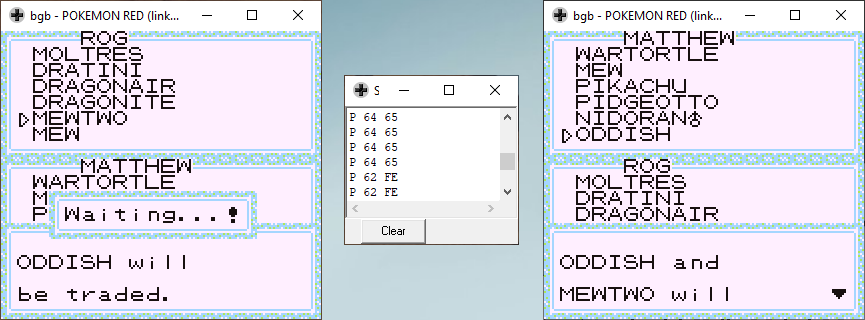
Player 1 selects index 4 (0x64; Mewtwo) and player 2 selects index 5 (0x65; Oddish) – a pretty bad deal. Player 1 has confirmed the trade and is waiting for player 2 to confirm as well.
If both players accept, 0x62 is exchanged as a confirmation and the trade
takes place. Since each game already has all of the necessary information about
the connected player’s Pokemon in memory, they already have everything they need
in order to trade and can copy the relevant memory right away. No further
transfers occur and the long-winded trade animation is played on both devices
purely for show. Both games are also saved during this time. When the sequence
is done, both players are taken back to the trade menu (“trainer data exchange”
step) and can trade more Pokemon if they wish.
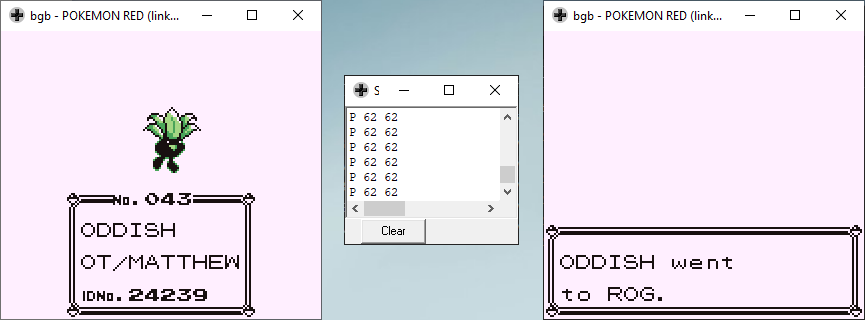
A successful trade
Implementing a mock trader #
With an understanding of the communication details behind Pokemon trades, it’s time to simulate it with a script that produces output adhering to the same protocol. This will be done using one module to interface with the BGB emulator over TCP, and another to actually generate the data and send it over that interface.
BGB link cable TCP server #
Not only does BGB use a simple TCP protocol for its link cable functionality – it’s well-documented too! All data is encapsulated into 8-byte packets. Four of these bytes always store the time at which the packet was sent. This is to enable two instances of the emulator to stay in sync. If one is running too far behind, the other can pause to allow catch-up (a luxury that’s not possible on real hardware).
The packet structure is as follows:
| Offset | Size | Description |
|---|---|---|
| 0 | 1 | Packet type |
| 1 | 1 | Packet data 1 |
| 2 | 1 | Packet data 2 |
| 3 | 1 | Packet data 3 |
| 4 | 4 | Timestamp |
There are 7 types of packets:
| Type | Name | Description |
|---|---|---|
| 1 | version | Contains the version of the protocol the emulator is using |
| 101 | joypad | Notification of controller input changes (used for remotely controlling the emulator) |
| 104 | sync1 | Indicates a byte sent from the master Game Boy |
| 105 | sync2 | Indicates a byte sent from the slave Game Boy; sent in response to a sync1 packet |
| 106 | sync3 | Either an acknowledgment of a sync1 packet or a timestamp update, depending on the value of the first data byte |
| 108 | status | Contains information about the state of the emulator (paused or running, supported protocol features) |
| 109 | wantdisconnect | Indicates a voluntary closing of the connection (avoids auto-reconnect logic) |
When the connection is established, each endpoint must send a version packet,
and if the version is supported then a status packet is sent in response to
complete the handshake.
The protocol isn’t that complex to begin with, but it can be further simplified
for this use case. We won’t be implementing an entire emulator, so we can send
dummy data for the status packet (i.e., never paused) and ignore sending and
receiving joypad and wantdisconnect packets altogether. For simplicity we
also will only ever allow the connected emulator to operate in master mode,
meaning incoming sync2 messages and outgoing sync1 messages don’t need to be
supported either. This will also allow us to eventually connect the emulator to
a real Game Boy via our TCP server, since real hardware will always need to
use an external clock signal due to the inherent latency of TCP.
Finally, the time of sending (measured in 2 MiHz Game Boy clock cycles) must be included in every message, but we don’t have to worry about that either. We can just lie and say that our server is always exactly in sync with the emulator it’s communicating with by returning the same timestamp value that was in the most recently received packet.
With all of this in mind, the high-level logic of our BGB link cable TCP server is as follows:
- Wait for a connection from BGB
- Send the
versionpacket - Wait for packets from BGB in a loop
- For
versionpackets, respond with astatuspacket containing dummy data - For
sync1packets, call a configurable callback function and send its return value to the emulator via async2packet - For
sync3packets, respond with async3packet - For
statuspackets, respond with astatuspacket containing dummy data
- For
The server also keeps track of the most recently received timestamp, which is used in all response packets to simulate being in sync.
And that’s it! The whole thing works out to less than 150 lines of Python. You
can check out the code
here.
The server is generic and allows sending arbitrary data via the configurable
callback function. Whenever a link cable byte is received from BGB (sync1
packet), the server will call the function to get the response. This will
allow us to easily re-use the server for anything we want. Right now, the
callback we supply will implement the Pokemon link cable protocol, but in the
future we could have it communicate with a real Game Boy! Doing things this way
also keeps the mock trader code self-contained, which it will need to be so it
can work with our eventual hardware setup.
One implementation quirk worth noting is that although the BGB documentation
says not to send status packets in response to status packets, not doing so
causes instability in the emulator’s link cable connection (sometimes the entire
application becomes unresponsive). It seems that if BGB doesn’t receive
timestamps for a while, it assumes the peer has gone out of sync and pauses to
give it some time. Since status packets contain timestamps (like all packets),
sending them like we do helps keep the emulator’s connection state up to date
and allows it to continue happily along. The problem likely could have also been
solved by sending sync3 packets on a regular basis, but this non-standard
approach keeps the code simpler (the server only responds to incoming messages
and never sends its own otherwise).
Now let’s test it out. We can supply a callback function that prints out the bytes we receive.
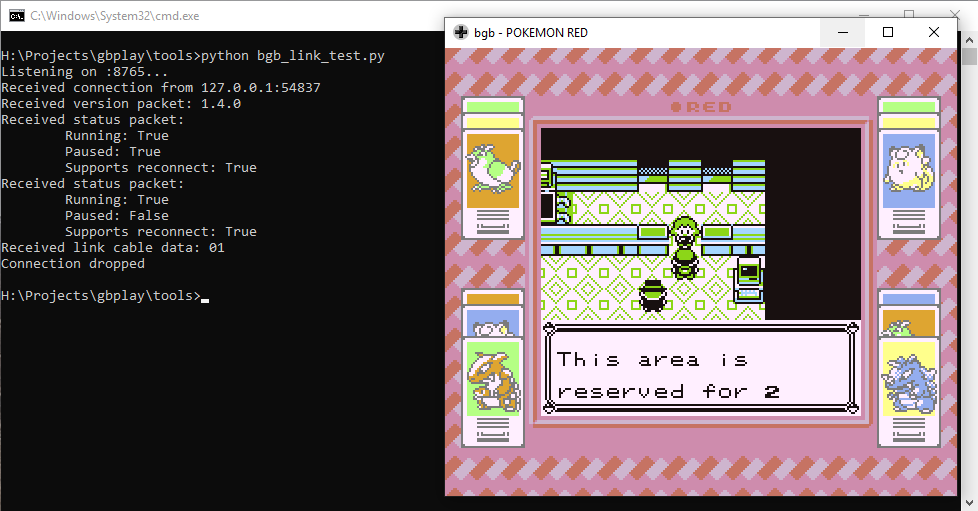
Testing our BGB link cable TCP server by printing out received data
After “linking” the emulator to our server and going to the Cable Club, a 1
is received – success! This is the game trying to operate in master mode per
its role negotiation scheme. Further, if we don’t respond for a while an error
is shown in-game. Now that our infrastructure is working, we can implement the
actual logic.
Mock Pokemon trader #
With the generic BGB link cable TCP server written, implementing the Pokemon trade state machine described earlier was relatively straightforward. The most error-prone parts were handling synchronization (e.g., making sure that the script receives the proper confirmation bytes before changing states) and the serialization of the Pokemon data structures. It only supports trades and will always trade the first Pokemon in the mock party. The party data is configurable via Pokemon data structure helper classes.
A single class keeps track of the state information and provides a member function which, given an input byte, will update the state and return the next byte to send. The mock trader script creates an instance of the state machine class using the specified fake Pokemon party. It then creates an instance of the BGB link cable server class using the state machine’s update function as the callback and runs the server. Once we have a way of communicating with real hardware, we can use this same callback function to generate data based on bytes received from a Game Boy.
Like the link cable server, this ended up not being overly-complex either. The code is available here and the final result is shown in the video below.
The link cable server and mock trader in action
Conclusion #
Going through this process required lots of learning and was very satisfying. We now know how Pokemon’s link cable protocol works and it’s very simple. Only a few bytes are needed at the beginning to put the game into slave mode and then the rest of the communication is symmetric – that is, each instance of the game sends the same type of data at the same time. This means that if we can get the two games into this mode, it should be possible for the rest to “just work” by naively forwarding bytes between them with no further intervention. Hopefully this is common since it will make the project easier overall. We’ll need to dig into more games to be completely sure. However, the implementation of the state machine wasn’t very complex, so if we end up having to write game-specific code then it doesn’t look like that will involve a substantial amount of work per game.
Regardless of how different games work, we now have two very valuable tools in our toolbox: the BGB link cable server will allow us to easily create other game-mocking scripts if need be, and to connect an instance of the emulator to real hardware! The Pokemon mock trader script – the goal of this experiment – provides us with known good data that we can use to verify our eventual hardware setup. The two are modular and self-contained, meaning they can be mixed and matched with other tools we develop as necessary.
Overall, I consider this a success in many ways! Next time we’ll look at connecting these new tools to real hardware.